How to clone Windows 7 system drive
This guide will show how to move Windows 7 x64 (should work with 32 bit version as well) from one drive to another (for example when you upgrading your HDD to SSD) in Acronis True Image 2013.
I spend great deal of time figuring this out, and was completely shocked by lack of such tutorial anywhere online. In fact I found endless forum conversation by people who say over and over again that it cannot be done, that you have to use Windows Recovery mode after cloning, etc. Total BS! And then there few tutorials that simply give wrong information, when I followed it I got “Can’t find Bootmgr” message.
But I’m telling you, it can be done, I’ve done it at least 3 times and everything works great! So here is the guide. I will not go over things like installing SSD drive into your computer, but it should give you enough information to do a successful clone of Windows 7. So let’s begin.
Before you start, please take a note that I’m not responsible for any data loss you might occur during this process!!!
- I assume that you already have Acronis True Image 2013 installed, and your new HDD/SSD is connected to the computer (do not disconnect your current boot drive yet).
- If you haven’t already, let Windows initialize new drive by opening Disk Managment console (diskmgmt.msc). It will ask you right away that new drive is detected and to initialize it. Select MBR or GPT (I verified with MBR only) and you should be done. Do not format or convert disk to Dynamic!
- Open True Image 2012
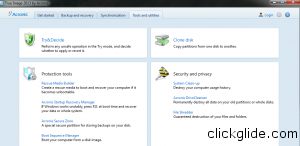
- Go to Tools and Utilities and Click “Clone Disk

- Select Manual

- Choose disk that has your current OS as Source
- Now select your new disk as target
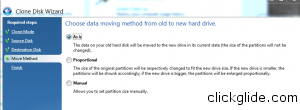
- Now comes most important step. You MUST select “As Is”, not proportional and not manual! I’ve spent few hours and Manual mode and couldn’t get disk to boot properly. Selecting As Is will leave same size partition, BUT you can always resize them later to fit larger drive.

- You will be asked to restart.
- Acronis will boot into it’s own mode, and after finishing cloning it will either shut down or reboot (you have choice).
- I chose to Shut Down, and disconnected old drive. You may remove it now if needed.
- After you power back up make sure you select your new drive as 1st Boot device in BIOS.
- You should now successfully boot into Windows 7!
- If your new drive is larger than old you can choose to expand C: partition now. To do this open Disk Management (run diskmgmt.msc), right click on your C: partition and choose Expand. No need to reboot.
There’s a slight chance that Windows or Office will become deactivated. If that happens you’ll need to re-activate them with Microsoft.
And remember, you can always plug in your old Hard Drive and everything will work as if nothing happened.
Tags: acronis, clone, guide, hdd, ssd, tutorial, upgrade, windows, windows 7

